

Adding DAFpay
Create Connects
This section is for fundraising platforms that serve many organizations and create a Connect for each one. If you are an organization integrating your own donation form, request a Connect ID from your Chariot implementation manager.
Each organization on your platform has its own Connect. The Connect ID tells Chariot which organization should receive the Grant. Use the same search-and-create sequence for the organizations in your initial launch and for every organization that enables DAFpay afterwards.
Each organization needs a Chariot account before you can create its Connect. Send organizations that do not have one to your co-branded Chariot onboarding link to claim their account.
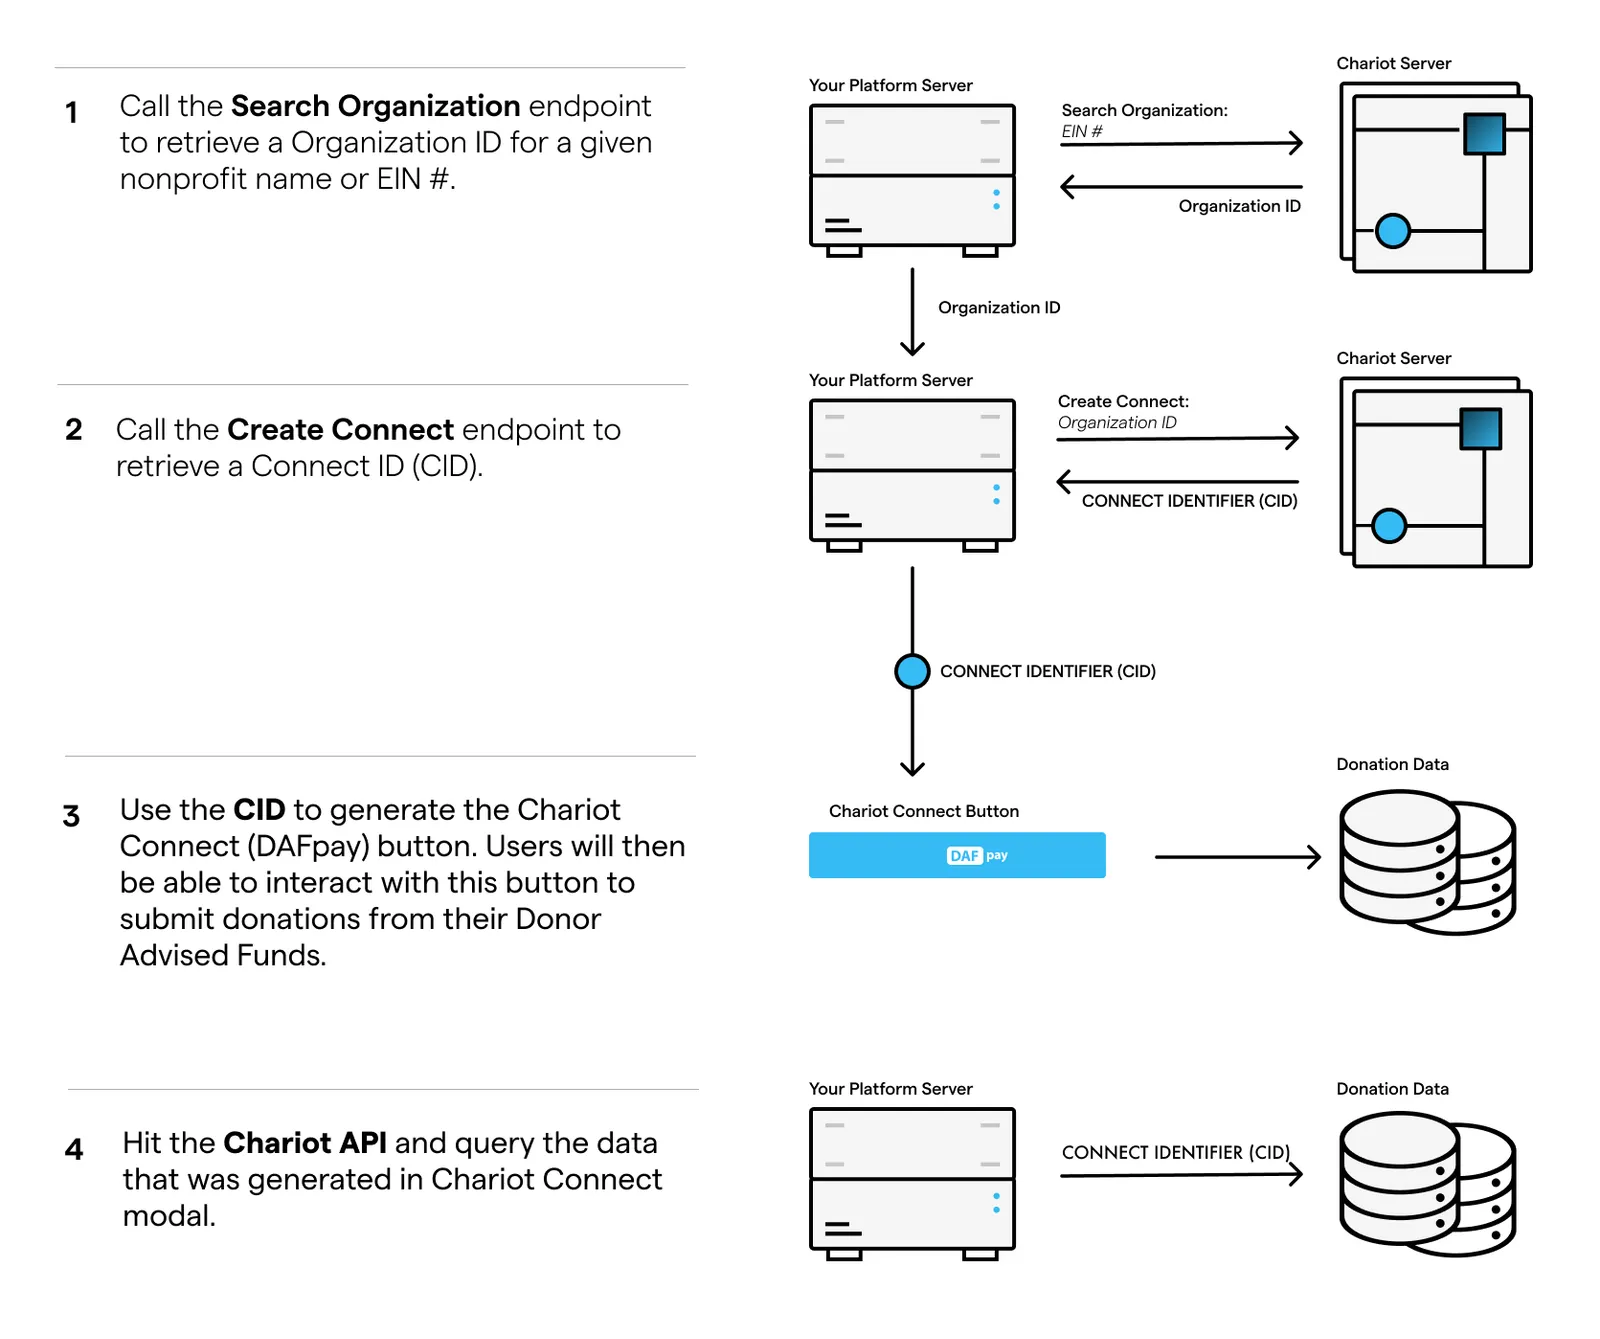
Search for the Organization
Use Search Organizations with the organization’s EIN whenever possible. Names may be ambiguous, but EINs identify the legal organization.
You can search for any valid EIN in sandbox, for example American Red Cross (53-0196605).
If the organization is not returned or is ineligible, tell the organization they cannot accept DAF gifts through your platform yet, and contact integrations@givechariot.com if the result is unexpected.
Create the Connect
Call Create Connect with the Chariot organization ID and a contact email that belongs to the organization. Do not use your platform’s support address.
Store the returned Connect ID on the corresponding organization record:
Sandbox Connect IDs begin with test_ and production Connect IDs begin with live_.
Create the Connect when the organization enables DAFpay, not during donor checkout. The call is idempotent: it returns the existing Connect for that organization on your platform. Send the contact email on repeat calls too.
Create Connects at Scale
Create Connect allows about 50 requests per second and 10,000 per hour, and reports the limits in the response headers. For a large launch, create every Connect first, then turn on the button.
Read the Connect ID from the same organization record you use to render the form, and do not render DAFpay for an organization that has no Connect.
Install DAFpay
Once you have the Connect, add the DAFpay button to your form. Load Chariot Connect directly from Chariot’s CDN, rather than bundling or self-hosting it, and initialize it with the Connect ID stored for the nonprofit whose form the donor is viewing.
Component Attributes
Chariot Connect watches all four for changes after the component has rendered.
Where You Can Embed DAFpay
DAFpay works on any domain and inside nested cross-origin iframes. You do not need to register a domain, and the checkout does not need third-party cookies or storage access.
By default, DAFpay opens a popup on mobile devices and in desktop Safari. When the button sits inside an iframe, it also opens a popup if that frame is not fully visible or its window is smaller than 390 by 640 pixels. Webviews always get the modal, and the context attribute overrides all of this.
Content Security Policy
Chariot Connect loads its script from Chariot’s CDN. Depending on the browser and viewport, DAFpay opens in a cross-origin frame or popup at https://secure.dafpay.com.
If your donation pages send a Content Security Policy, merge these sources into the applicable directives. The block below is an example, not a complete policy.
The parent page does not need to add Chariot to connect-src. DAFpay API traffic originates inside the cross-origin frame.
If your security policy cannot allow inline styles, confirm the supported nonce or hash approach with Chariot before launch.
If your page sends a Permissions-Policy header, allow publickey-credentials-get and publickey-credentials-create for https://secure.dafpay.com, or passkey sign-in inside the checkout will fail.
If the button does not render or the modal does not open, see Troubleshooting.
Prevent Blocked Popups
DAFpay must open in direct response to the donor’s click. Keep the time between the click and the DAFpay window opening under one second.
Chariot Connect gives you two callbacks for passing form data, and which one you use decides when your code runs relative to the launch.
Whatever onAsyncDonationRequest awaits, the donor waits on a loader inside the open checkout. Keep it to the work the Grant actually needs, and move anything you could do before the click, such as eligibility lookups or analytics, out of it.
Returning a promise from onDonationRequest behaves like onAsyncDonationRequest: DAFpay launches first and resolves your promise into the open checkout, so the popup is not blocked. Reach for onAsyncDonationRequest when awaiting is what you mean.
If your platform uses a custom button or Shadow DOM, do not call your server between the donor’s click and triggering DAFpay. That work runs before Chariot Connect sees the click, so neither callback can protect the popup. Complete the request first, then let the click open DAFpay immediately.
Make DAFpay Easy to Find
Platforms that show DAFpay up front see about 10x more DAF giving: 9.0x on everyday forms and 10.7x on campaign forms.
For Express Checkout, place DAFpay near the amount selection alongside other primary payment methods.
For a multi-step form, show DAFpay on the first step or clearly indicate that Donor Advised Fund giving will be available later in the flow. Do not hide DAFpay behind a generic More or See more control unless the visible label tells donors that DAFpay or Donor Advised Fund giving is available.
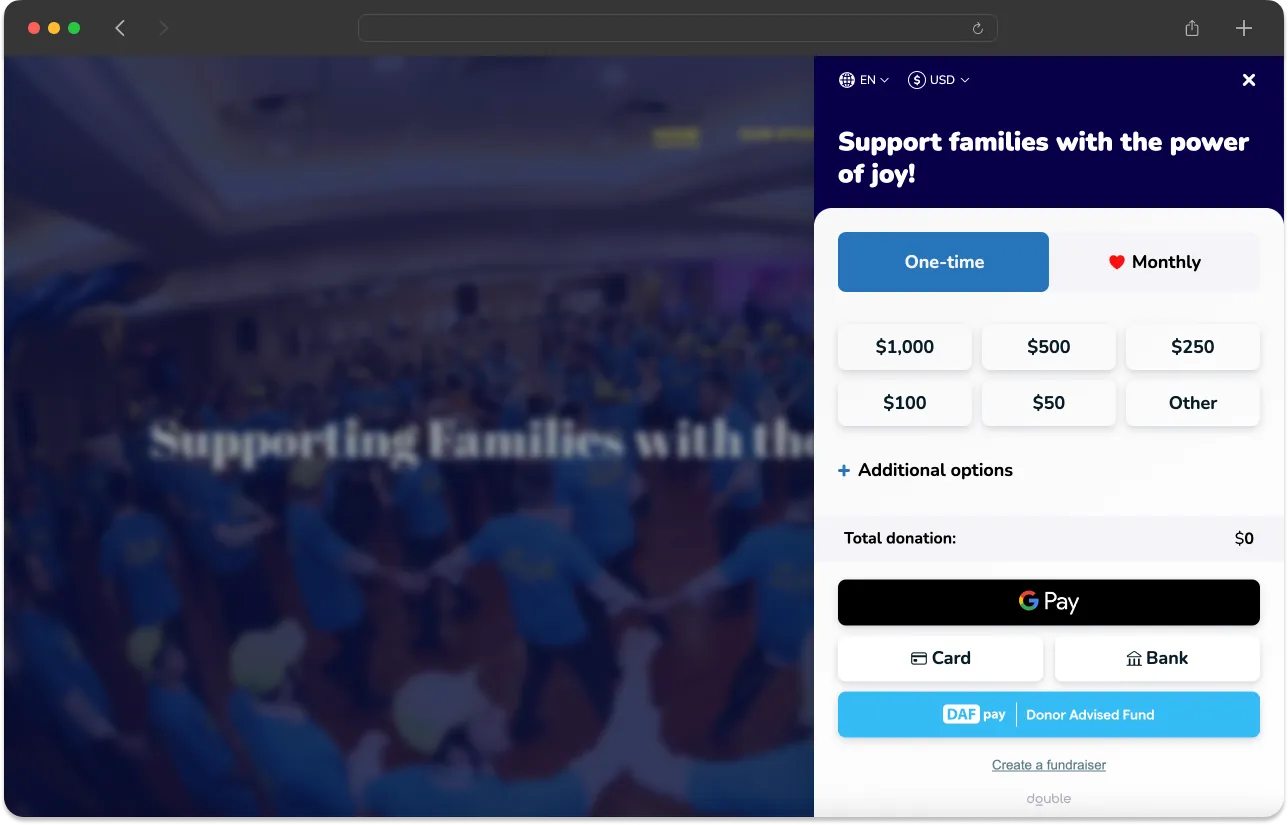
Check it at mobile widths and on every form and campaign type that supports DAFpay.
Styling
theme is optional. Set it on the chariot-connect element to change how the DAFpay button looks.
You can style the button only. The checkout’s branding and text are set by Chariot.
DefaultThemeLightModeThemeLightBlueThemeGradientTheme




You can also register a custom theme:
Capture Donation Data
With the button installed, use onDonationRequest to pass information from your donation form to DAFpay. If you need to call your own server first, use onAsyncDonationRequest instead; Install DAFpay compares the two. Register the callback on the element you installed, once the component has loaded:
Supported Fields
DAF Grants use whole-dollar amounts. DAFpay drops any cents, so 2550 opens as $25, and Create Grant rejects an amount that is not divisible by 100. Validate before you open DAFpay.
There is no maximum-amount field. To enforce a maximum, check the returned amount before you call Create Grant.
What to Pass in Metadata
Form identifiers: Pass identifiers the nonprofit needs for CRM coding, such as campaign, appeal, designation, source, form, comment, dedication, and tribute data. You do not need to pass the page URL: Chariot records it on the Donation as initiation.web_location_url, including any tracking parameters already in it, such as a source or campaign code.
Donor information: For express checkout, you do not need to pass any donor information. DAFpay fills in the donor’s details from their DAF account after they sign in and collects any required information that is missing from the provider within the modal. If your form collects donor details before showing the DAFpay button, pass them in onDonationRequest so the donor does not have to enter them twice.
Purpose or designation: You can pass the donor’s designation in one of two places. In the top-level designation field, it is sent to the DAF provider with the Grant request (truncated at 100 characters). Some providers review a restricted designation before releasing the Grant, which can slow gift delivery time. You can instead pass a designation in metadata. In that case, the request stays unrestricted (the provider applies its own default purpose, usually “Where needed most”) and your designation shows up in the Chariot dashboard.
Metadata can only be set in the browser. Create Grant has no metadata field, so anything you want stored on the gift has to be passed at this point and cannot be added or corrected from your server afterwards.
If your form allows a donor to divide one gift among multiple designations, you can use a custom object in the metadata to specify the breakdown between the designations.
Fees the Donor Covers
If your donation form allows a donor to cover fees, pass the increased amount including the fee to onDonationRequest. Since the processing fee is percent based, raising the amount will raise the fee. Grants must be in whole dollar increments, so round the total to the nearest whole dollar and compute the fee from that final amount.
Solve for the amount to capture:
Tips are not permitted on DAF gifts, because DAF funds cannot go to a for-profit entity. Suppress any tip option when the donor selects DAFpay.
Disable Until Validated
If your donation form has required fields, disable the DAFpay button until the form passes validation. Keep your own form validation and error messages alongside it, so the donor can see what to fix.
Setting the disabled attribute on the element will prevent the modal from launching. The button looks the same when disabled, so show your own validation messages.
Handle the Result
When the donor finishes in DAFpay, Chariot Connect tells your page what happened through three events.
A one-time success payload has this shape. user holds the donor’s details when Chariot has them:
On CHARIOT_SUCCESS
Associate detail.workflowSessionId with the current platform transaction, nonprofit, and Connect ID, and read the donor’s details from detail.user.
Follow the steps on Create the Grant to initiate the Grant.
On CHARIOT_EXIT
CHARIOT_EXIT fires whenever a donor leaves the modal without an authorized grant intent. This includes normal exits back to your form, unintegrated grant intents, and error cases. See all exit reasons below: